Templates
 Audio for slide 1 (mp3 |6|KB)
If it turns out that the walls are not square, or that there are unusual angles between walls, you may need to make up a template to record the angle or shape.

 Audio for slide 2 (mp3 |6|KB)
Depending on the size of the template you're making, you can use cardboard, plywood, MDF (medium density fibreboard), thin timber or other suitable board products.
 Audio for slide 3 (mp3 |6|KB)
Recording angles with a template
To make a large template, it's best to use plywood or another board product about 10 mm thick. Cut the board to the lengths of the walls that form part of the job. Then put the boards in position against the walls and screw them together where they overlap.
 Audio for slide 4 (mp3 |6|KB)
For example, if the template is being used to get bench top angles, you will need to fit the template at exactly that height.
If you need to take a large template back to the workshop, you can unscrew the boards and dismantle them so they'll fit easily in your vehicle.
 Audio for slide 5 (mp3 |6|KB)
Scribing deviations in a wall
There will be times when you'll need to cut a filler piece or end panel to cover a gap between the wall and a cabinet. If the wall isn't flat, you can make up a template to the exact shape of the wall, and then transfer the line across to the filler piece or end panel. You can also use this technique to shape a bench top to fit exactly against the wall.
 Audio for slide 6 (mp3 |6|KB)
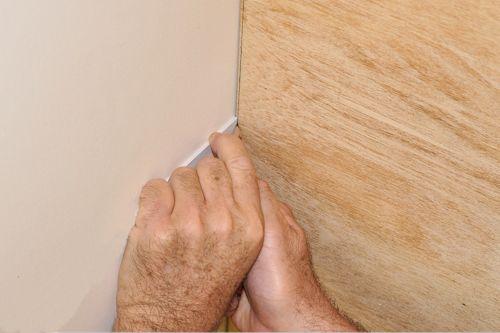
Some installers use a small block of wood to guide the pencil, and slide the block along the wall to follow the contours.
Other installers use a compass, with the point following the line of the wall.
You can also buy scribing tools to do the same job.
 Audio for slide 7 (mp3 |6|KB)
If your template is made from timber or sheet material, you might use a plane or jig saw.
If it's cardboard you can simply use a Stanley knife.
 Audio for slide 8 (mp3 |6|KB)
Cut the piece to the line, being careful not to chip the finished surface.
We'll talk more about this technique in the unit: Adjusting cabinets on-site.

Learning activity
Audio 9 (mp3 |6|KB)If you haven't been involved in scribing a template before, have a go now by following the steps below. Let's say you need to cut an end panel for a cabinet and it requires a template to get a tight fit to the wall. You can work from the top of the skirting board if you wish, or work from the floor and incorporate the profile of the skirting into the template.
- Find a wall with deviations in it. Use your level as a straight edge, or a piece of kickboard or other board with a true edge. Hold it against the wall and look for gaps. Check several walls and choose the one with the worst deviation.
- Cut the template material to length. Use cardboard, plywood or some other thin board and cut it to the correct length - say 870 mm if you are working from the floor to the underside of a bench top.
- Scribe the wall contours with a pencil. Use a block of wood to guide your pencil line. Choose a block that's slightly thicker than the widest point in the gap that you're scribing.
- Shape the template to the pencil line. If your template is made of cardboard, you can simply use a Stanley knife. If you're using a board product, you might be able to shape it with a coping saw or hand plane.
If it turns out that you need to use a power tool, make sure you secure the template properly and follow all required safety procedures. Talk to your trainer or supervisor about methods for securing narrow boards to a saw stool or work bench if you're unsure. - Test the template against the wall. Hold the template in place and check for gaps. Mark any high spots with a pencil and reshape the line until you're happy that the fit is close enough. Try to get a maximum gap of 1 to 2 mm at the worst points.